

One of the most significant issues many recreational vehicle owners face is slide-outs. After all, they are heavy and have a lot of complicated parts. So if yours is not working like it used to, here’s how to fix a sagging RV slide out:
- Identify the cause
- Extend and retract the slide-out to see if it resets
- Find the adjustment points and adjust if needed
- Check the hydraulic slides
- Use support braces temporarily until professional repairs can be made
As RV owners, we know the importance of caring for our homes on wheels. After all, it’s not just a vehicle but our mobile living space.
Let’s be honest; a sagging slide-out is unsightly and makes any comfortable living space a distant dream. And the last thing we need is a hefty repair bill from an RV repair shop. So, what’s the best way to fix a sagging RV slide-out? Repair, adjust, or brace?
We’ll dive into the above details in this article, so read on to save yourself some money and make your beloved Ford F-250 or any other RV’s slide-out functional again! So, roll up your sleeves and jump into the DIY adventure of repairing your RV’s slide-out.
With our guide, you will indeed have your slide-out functioning at its best in no time. Good luck fixing your sagging slide-out and getting back that much-needed extra space in your RV!
What causes an RV to slide out to sag?
Most RVs feature slide-outs extending from the main floor and providing extra parking space.
Some have 1 small slide-out while others may have as many as 3 or 4. This room extension primarily comprises the slide-out mechanism, rail system, slide floor, and slide-out supports. Over time, this complex system can face several issues, such as:
Wear and tear
One of the main reasons for a sagging slide-out is wear and tear. Recreational vehicles are built to move and can experience significant wear and tear in just a short amount of time. Even the sturdiest RVs can face wear and tear issues, leading to a sagging slide-out.
Foreign objects
Another common cause of a sagging RV slide-out is foreign objects getting stuck at the bottom of the slide. These objects can place additional stress on the slide-out mechanism and cause it to sag over time. Inspecting your RV slide-out for foreign objects is always a good idea, especially before going on a long trip.
Need for additional support
Another reason your RV slide-out may be sagging is the need for additional support. Some RV manufacturers don’t add enough support to the slide-out, given the extra floor space it creates. This leads to the RV’s slide-out not having enough support, causing it to sag over time.
Slipped brakes
Sometimes, the brake that keeps the arms extended may have slipped, causing the arms to gently retract and causing your slide out to sag.
Also, I don’t know that it would cause a slide-out to sag, but on my RV’s (Newmar Bay Star) maiden voyage, one of my large slide-out’s roller wheels popped out and got stuck under the floor board!
Luckily, I was able to pry it out with a crowbar and Newmar customer service confirmed it would still work with the remaining 4 rollers.
But you can bet it was a little scary in the moment!
The slide out with the awning needs to be cleaned on top. Debris is causing pooling of water. Water will kill ur RV. We plan on trading this in next year pic.twitter.com/EkISaZwRJT
— Frank (@SpiritsArReal) January 9, 2023
Is it bad to have a sagging RV slide-out?
A sagging slide-out means the slide-out is not level, and it can cause significant problems in the long run. The most obvious case is the reduced floor space, which can make your RV feel cramped and constricted.
And if you do extend it, your new floor area will have a slope which is no fun either.
But, the sagging slide-out can also cause problems with the slide-out mechanism, resulting in the slide-out becoming stuck, and you won’t be able to retract it back into the main floor. This scenario can be seriously problematic, especially in a remote area with no repair shop nearby.
Fixing a sagging RV slide-out might seem intimidating, but it’s not impossible.
The best way to fix it depends on your slide-out mechanism, and it’s crucial to ensure you identify the problem before attempting to fix it. RV manufacturers provide various adjustment points on the slide-out supports and rail systems, allowing vertical slide-floor adjustment.
One good idea is to check if the support brackets are still in good condition and are tight and sturdy. However, if foreign objects regularly get lodged into the bottom of the slide floor, it can weaken the support, leading to sagging.
Can you reset an RV slide-out that is sagging?
So, can you reset an RV slide-out that is sagging? The short answer is it depends.
If a faulty hydraulic system causes the sagging, take it to a repair shop or contact the manufacturer for assistance. However, if you’re dealing with a slide-out that is out of alignment or needs a little extra support, there are some things you can try on your own.
First, check for adjustment points on the outer edge of the main floor’s slide supports or hardware.
Depending on your RV’s slide-out mechanism, horizontal and vertical adjustment points may exist. If you need help finding them, consult your owner’s manual or the manufacturer for guidance.
Another DIY option is to add additional support underneath the slide-out.
This can be done by adding carriage bolts or other hardware to the bottom of the slide. Ensure you have enough power and room to work safely underneath the RV. Adding extra support can help distribute weight more evenly and prevent future sagging.
In my opinion, resetting a sagging RV slide-out can be tricky, but it’s not impossible. Stay safe and consult the manufacturer or a professional if you need clarification.
RV Slide Out Repair Pine Bluffs Wyoming’s 1st Choice in Service – http://t.co/q67YZMI5Sv pic.twitter.com/9yXctDknaE
— RVnews (@news4RV) June 9, 2015
How to avoid your RV slide-out sagging in the future
So, how do you avoid a sagging RV slide-out?
The best way is through regular maintenance. While most RV manufacturers recommend bringing your RV to a repair shop for routine maintenance checks, you can do a few things to maintain the slide-out system yourself.
Start by inspecting the adjustment hardware on your RV’s slide-out. Look for any bolts or screws that may be loose or missing and tighten or replace them as necessary. Next, inspect the slide floor for any damage or warping. If you spot any issues, repair them immediately to prevent further damage.
Another way to prevent sagging is by ensuring that your RV’s slide-out is level.
This can be achieved by using a hydraulic slide system, which adjusts the slide-out to level based on the level of the main floor. If your RV doesn’t have a hydraulic system, you can manually level the slide-out by making vertical adjustments to the adjustment points underneath the slide floor.
Finally, avoid putting too much weight on your RV slide-out and retract the slide when it’s not in use. These simple steps can save you thousands of dollars in repair bills and help keep your RV slide-out functioning smoothly for years.
Can you use braces to support a sagging RV slide-out?
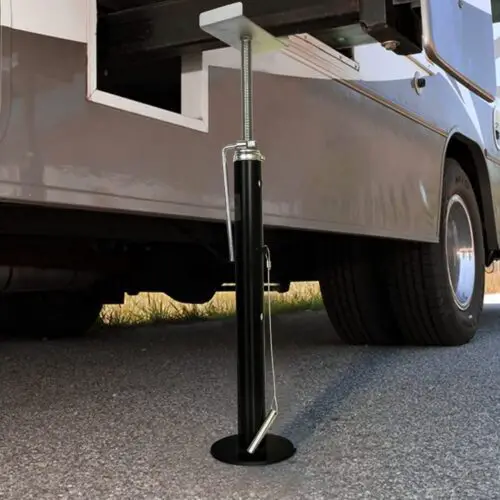
One of the best ways to support a sagging slide-out is to use slide-out supports, like these great ones from Amazon.
These supports can be purchased from RV manufacturers or camping supply stores. They are additional support systems that attach to the bottom of the slide-out and the main floor of the RV. This added support can help lift the sagging slide-out and prevent further damage.
Those WEIZE Heavy Duty Slide Out Support arms can hold up to 5,000 lbs, and can adjust from 20″ to 48″. The current price is under $60, so it’s a no-brainer compared to taking your RV to a repair shop!
CLICK HERE to check the current price on Amazon.
It is important to note that hydraulic slides may require the help of a professional repair shop. However, supporting the sagging slide-out with braces can be a do-it-yourself job for those with mechanical slides. Just make sure to follow all safety protocols and instructions the manufacturer provides.
However, when using braces, ensure that you’re placing them correctly on the bottom of the slide and using carriage bolts to ensure they don’t shift and cause further damage.
Of course, fixing a sagging slide-out with braces is not guaranteed and may only work for some. In some cases, more drastic measures may be taken, such as replacing the entire slide-out or installing hydraulic slides for more power and support.
However, braces could be worth a shot for those on a tight budget or who want to try a DIY fix before taking it to a repair shop and facing a high repair bill. Just remember, adding extra support to your RV’s slide-out should only be temporary, so don’t rely solely on them for a long-term solution.
Rebuild a slide out on a 2018 Jayco that was jackknife pretty bad. We repair all major and minor issues. We also honor warranty jobs, We’re mobile and we come to your home or campground. Call or Text: 716-218-4033.#RV #RVrepair #RVservice #motorhome #MobileRV #rvrepairshop pic.twitter.com/6C91jFeNGh
— RV Unlimited (@RvUnlimited_) April 21, 2020
How to fix or adjust sagging RV slide-outs (step-by-step)
Luckily, there are ways to fix or adjust a sagging RV slide-out without breaking the bank.
Step 1: Identify the problem
The first step in fixing a sagging slide-out is to identify the cause.
The problem is usually due to worn-out slide-out supports, loose screws, or adjustment hardware. Check the bottom of the slide to ensure no foreign objects are blocking it and preventing it from extending out.
Step 2: Find the adjustment points
Most RV manufacturers place adjustment hardware on the rail system beneath the slide floor. This is where you can make vertical adjustments to your slide-out. Look for carriage bolts that hold the slide-out supports in place, as these are the adjustment points you’ll need to work with.
Step 3: Make the adjustments
Once you’ve found the adjustment points, use a socket wrench to loosen the nuts holding the carriage bolts in place. With enough power, you should be able to move the slide-out supports up or down to adjust the height of your slide-out. Make sure to adjust both sides equally for symmetry.
Step 4: Add extra support
If your slide-out is still sagging after adjusting, consider adding additional support. You can install vertical supports beneath the main floor of your RV’s slide-out room. These supports will provide extra stability and ensure your RV and slide out floor stays level.
However, when adding additional support to your RV’s slide-out, it’s essential to consider your RV’s weight and load capacity. Adding too much weight or installing inadequate supports can cause further damage to your RV’s slide-out room.
Step 5: Check the hydraulic slides
If your RV has hydraulic slides, check the fluid levels and ensure no leaks. Low fluid levels or leaks can cause slide-out to sag, so keeping your hydraulic system in good condition is essential.
Doing this will help you avoid any major repairs, giving you more living space to enjoy. And if you’re not comfortable checking the hydraulic system yourself, it’s always a good idea to take it to an RV mechanic for a professional inspection.
Conclusion
Understanding the proper steps and techniques to address this problem can help ensure a safe and comfortable traveling experience.
First, check for foreign objects in the rail system or adjustment points, which could prevent the slide-out mechanism from properly extending. Adding additional support to the bottom of the slide-out with carriage bolts or vertical adjustment hardware is also a good idea.
For those with hydraulic slides, make sure they have enough power to extend and retract properly. And for Ford F-Series RV owners, remember that your slide floor may be attached to the main floor with screws rather than bolts.
Remember, a sagging slide-out takes away valuable floor space and can be dangerous if not properly addressed. Take the time to give your RV’s slide-out support some TLC, and you’ll save yourself a hefty repair bill. Good luck fixing that sagging slide-out, and enjoy the extra living space it provides!
Image by Unbox Science from Pixabay
Middle Class Dad is a participant in the Amazon Services LLC Associates Program, an affiliate advertising program designed to provide a means for sites to earn advertising fees by advertising and linking to Amazon.com. As an Amazon Associate, I may earn a small commission from qualifying purchases if you click to Amazon from my site and choose to make a purchase. This is no way increases the cost to you.